Building upon the ‘Hello World!’ patch tutorial, we’ve learned the fundamental process of creating objects and running a Max patch. In this lesson, our focus shifts to crafting a simple additive synthesizer. Essentially, an additive synthesizer generates sound by playing a collection of sine waves simultaneously, and for this tutorial, we will create our own.
A list of new objects that we will use:
kslider: An on-screen keyboard that sends out MIDI key numbers.
mtof: Converts MIDI key numbers to frequencies.
cycle~: Generates a sine wave.[1]
*~: Multiplies values with incoming signals.
*: Multiplies a value with an incoming number.
ezdac~: This connects your signal to the DAC, allowing you to listen to your signal. It is a clickable button for on/off functionality as well.
Checking Out Help Patches in Max:
Each patch has its own help patch, complete with useful demos, examples, and a related object list with information. To open it, switch to edit mode and [option] + [left-click]. While you can copy the entire help patch or parts of it for your use, please be mindful that any changes you make to the original help patch and save will be permanent. It’s advisable not to alter the help patch for future reference. Copy and paste into your patch or create a temporary patch for modification and practice.
Creating a Sine Wave
The cycle~ object is a sinusoidal oscillator. If we create an object of cycle~ 440, it will generate a continuous sine wave with a frequency of 440 Hz.

When creating a sinusoidal wave using the cycle~ object, the output amplitude is 1.0, which is the maximum value. While it’s acceptable to send this signal to your DAC without issues, engineers typically leave some headroom for potential emergency situations. As a safety measure, let’s attenuate the signal slightly. To achieve this, we’ll use the *~ object, which essentially multiplies two signals. We’ll create a *~ 0.9 object, indicating that we will multiply the incoming signal (a 440Hz sine wave) by a continuous signal with an amplitude value of 0.9. Through this object, the amplitude of the 440Hz sine wave will be reduced to 0.9.
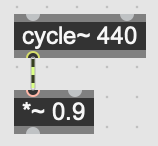
You may notice that the cord (or line) between cycle~ and *~ has yellow and black colors, different from any cords we saw in the previous tutorial ‘Hello World!.’ This colored cord is used to indicate the flow of audio signals.
The next step is to connect your attenuated signal to the DAC so that we can hear it. To achieve this, create an ezdac~ object. After typing the object name and pressing enter, you will notice that the typical object shape changes into a speaker icon button, like this:

Connect the output of the *~ object to ezdac~. You may notice there are two inlets in ezdac~. Please connect the *~ outlet to the left inlet of ezdac~.
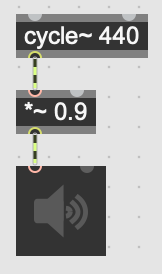
Change the edit mode to view mode and click on ezdac~. You should hear a 440Hz sinusoidal signal in your left channel. To turn it off, click on ezdac~ again.
As you type in ‘440’ in the cycle~ object, the sinusoidal oscillator generates a frequency of 440Hz. It’s easy to imagine that if we change the number, we could create a different frequency. It turns out the cycle~ object can receive a float number as a frequency information, and it will change the resulting frequency when it receives a new frequency number in a float number format. As it would be nice to have a keyboard, as we want to specify a specific note, we may want to create an object called kslider.

Similar to ezdac~, when you create a kslider object, it transforms into a graphic object, resembling an onscreen keyboard. In the image above, you’ll notice the presence of the mtof object connected from the outlet of the kslider object. The mtof object is a MIDI to Frequency converter. Thus, when the kslider sends out MIDI key numbers associated with each key, the mtof object converts those MIDI key numbers into frequency information. Here is a complete example, all together:
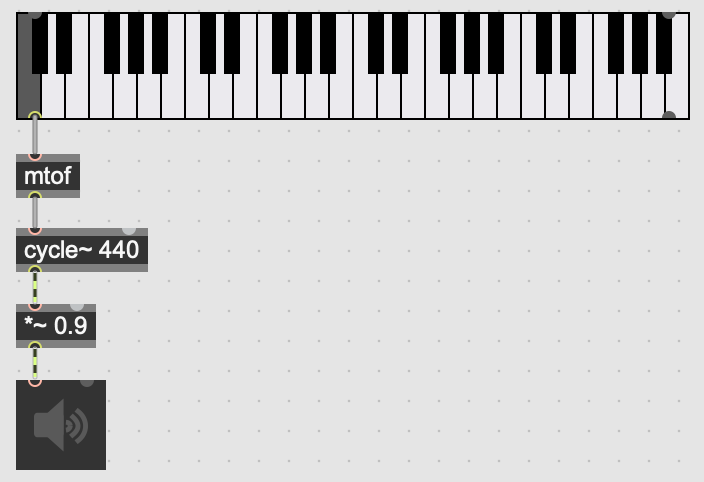
You’ll observe that each key of the kslider produces a different note when clicked. However, it’s essential to note that this is a single sine wave tone generator and not an additive synthesizer. Additive synthesis involves creating timbre by combining multiple sine waves. Therefore, let’s add a few sine waves to explore how this process works.
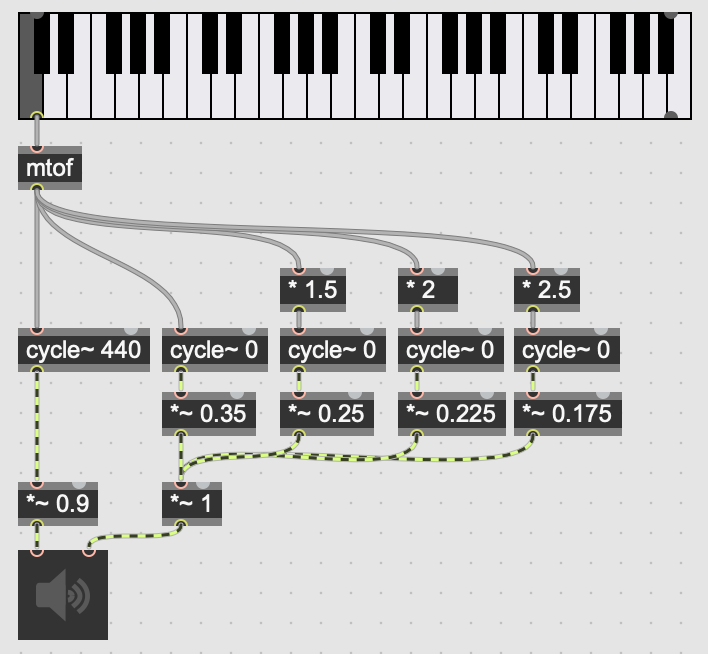
If you compare the right above patch to the previous one (which had only one sinusoidal generator), you’ll notice that it has incorporated the following section. Its final output is connected to the right channel of ezdac~, indicating that you’ll hear the result of additive synthesis in your right channel.
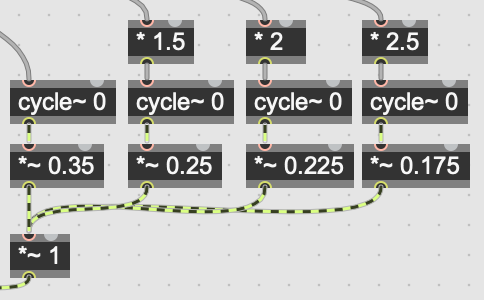
Let’s analyze the function of this newly added section. The three objects in the first line (* 1.5, * 2, and * 2.5) receive frequency information and then multiply their individual values accordingly. For instance, if we press the C note, it will result in G (multiplied by 1.5), one octave higher C (multiplied by 2), and E (multiplied by 2.5). You might be wondering why multiplying by 2.5 does not yield one octave higher G. The reason is that the relationship between frequency and note is not linear; it follows a logarithmic ratio. This implies that to generate notes two octaves higher, we need to multiply by 2^2, not 3.
The second line features four cycle~ objects with an initial value of 0Hz. This generates a DC signal and no sound initially, which is acceptable because as soon as we press the kslider, the initial value will be replaced with the new frequency.
The subsequent four *~ objects modify each amplitude. Notably, the fundamental frequency (on the leftmost side) has the largest amplitude (0.35), while higher partials have smaller amplitudes. Feel free to experiment and adjust these values to create different timbres. It’s important to note that the sum of these amplitudes should be 1.0 or less. Exceeding this sum may result in unwanted noise. The bottom object (*~1) consolidates all four oscillators, and you can adjust the overall amplitude sum. The following equivalent expression avoids creating noise as the final amplitude remains within 1.0.

Conclusion
We have successfully created a simple additive synthesizer using four sinusoidal oscillators! To produce more intricate sounds, you can add additional partials, but it’s crucial to ensure that your output amplitude remains at 1.0 or less to avoid introducing unwanted noises. Do not hesitate to enhance your synthesizer by incorporating different sliders, knobs, envelopes, and various interface elements to make it interactive and easy to control. This marks the beginning of sound creation in Max. Feel free to explore additional resources and envision new possibilities. Keep in mind that techniques and technology are readily available, but your creativity and imagination are uniquely yours and constitute the most crucial elements to cultivate.
[1] If an object name has ~(tilde), it signifies that the object deals with signals.
Reply