The SFZ format is a file format used for defining sound libraries in a plain text file. Essentially, a file with a .sfz extension contains instructions and parameters on how a sampler should play back a set of audio samples listed in the .sfz file. These instructions and parameters cover various aspects, including key ranges, velocity layers, mapping, modulations, and more.
The ACIDized WAV file is another file format for samplers, and it is a single file with all metadata for the sampler. For end-users, this might be an easy solution, as you just need to drag the file into your sampler. However, it is quite limited because all the metadata is already stored with the audio samples, and you cannot change it. In contrast, the SFZ file is a human-readable text file that can be modified in any text editor, such as VSCode, Sublime Text, or even the default Text Editor. This allows a user to customize and fine-tune how their sound library should work within a sampler. Perhaps the downside is that the SFZ file is a separate file from the audio sample, so you need to manage one more file, but the benefit is significant. One SFZ file can handle many audio files, and these audio files can be uncompressed or compressed, such as WAV, AIFF, or FLAC.
Recommended Software for Editing SFZ Files:
- Visual Studio Code (https://code.visualstudio.com/?wt.mc_id=vscom_downloads)
- vscode-sfz Extension (https://marketplace.visualstudio.com/items?itemName=jokela.vscode-sfz)
Visual Studio Code (VSCode) stands out as a highly popular, free Integrated Development Environment (IDE) suitable for a wide array of programming languages. The vscode-sfz extension enhances your SFZ file editing experience by providing color coding and intelligent features. This functionality proves convenient by visually signaling errors through distinct colors and auto-filling languages as you type.
For those who prefer a simpler approach, Sublime Text (https://www.sublimetext.com/) offers an alternative. To enable syntax highlighting in Sublime Text for SFZ files, you can refer to this GitHub link: (https://github.com/sfztools/syntax-highlighting-sublime-text).
A Working Folder and SFZ and Sound Files Structure
It is not mandatory to have the following file organization, but this might be a good solution to consider:

As you can see, the WAV files are organized in a subfolder. This can be advantageous because you can have many subfolders with various sounds, and you can add more SFZ files in the parent folder to access all of your organized WAV files. This way, you do not need to make additional copies of sample files, and you can manage everything in one place.
Analysis of the Sample Code

Line 1: If you would like to include any descriptive words or explanations for yourself or others, you can start with two slashes (//), and your sampler will ignore everything after that until it encounters the next line.
Line 3: <control> headers mark the beginning of your code and should come before <global>. The <control> headers include:
- #define
- default_path
- note_offset
- octave_offset
- label_ccN
- set_ccN
Line 4: You set your sample’s path here. If your SFZ and WAV files are in the same folder, you may simply remove this line. In our sample code, all the WAV files are located in the subfolder ‘sounds,’ so we need to assign ‘sounds/’. (Note: the last slash (/) is necessary.)

Line 6: <global> is where we can input parameters that apply to all regions. For example, lines 7 and 8 will apply to all other regions below.
Line 7: The ‘off_mode’ opcode determines how we want to release the voice. If set to ‘normal,’ the release time we specify (line 8) will take effect. If set to ‘fast,’ the voice will terminate immediately.
Line 8: The ‘ampeg_release’ opcode sets the duration for hearing the voice when releasing a pressed key. It is a floating-point number with a range between 0.0 and 100.0. If we want to terminate the voice immediately, we can use the ‘loop_mode’ opcode instead and set it to ‘one_shot’. Please remember that this is in <global>, and any opcode here will affect all the following regions unless you override it. We will discuss how to override opcodes in a moment.

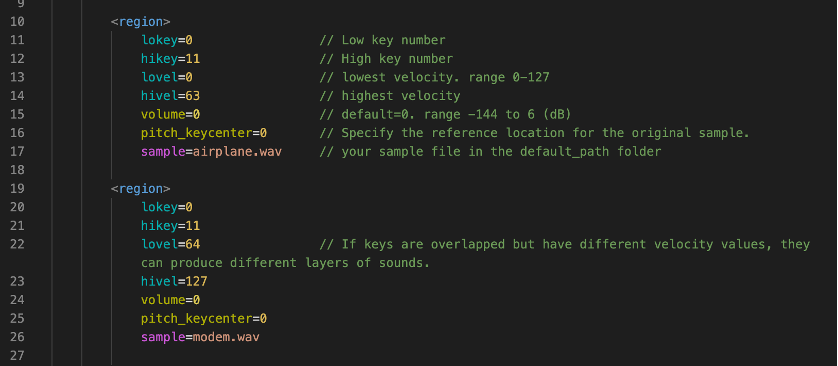
Line 10: Your sampler instrument will typically consist of at least one <region> or more, depending on your design preferences. You can assign a WAV file, and the information within this region will map it to the sampler. The ‘lokey’ and ‘hikey’ opcodes establish which parts of the keyboard will be associated with this region. In this example, we’ve set it between 0 and 11, covering one octave (from C to B). For reference, if you wish to set it in the middle C range, you may use 60 (middle C) and 71 (B, which is 11 semitones up from middle C) instead of 0 and 11.
The ‘lovel’ and ‘hivel’ opcodes determine the lowest and highest velocity mapped. In this case, it is set from 0 to 63. Therefore, if you press very fast (considering the maximum velocity value is 127), it will exceed 60, and you will not hear the sound. When you click the virtual keyboard, the bottom of the key represents higher velocity (faster touching, resulting in louder sound), while the top part signifies lower velocity (slower touching, resulting in softer sound).
While velocity and volume share similarities, they are distinct. Velocity is how fast you touch the key, and volume is how loud the instrument is. We will delve into the differences between volume and velocity later. For now, understand that volume is measured in dB (Decibels), and if you don’t set it up, 0 will be applied as the default.
The ‘pitch_keycenter’ opcode references your original sample. For example, if you set ‘pitch_keycenter=60,’ and your sample is concert A (440 Hz), pressing middle C (key 60) will produce the sound of concert A, not middle C. If you press D, a major second above middle C, you will hear B instead of D.
The ‘sample’ opcode specifies the sample file of your choice.

There are two regions, and I invite you to compare them to discern similarities and differences. You’ll observe variations in the velocity opcodes (‘lovel’ and ‘hivel’) and the ‘sample’ opcode. Despite both regions having the same ‘lokey’ and ‘hikey’ opcode values (0 and 11), they each feature distinct samples (‘airplane.wav’ and ‘modem.wav’) assigned to the same keys.
An intriguing aspect is that ‘lovel’ and ‘hivel’ differ between the two regions. Notably, the first region covers the lower half (0-63), while the second region covers the upper half (64-127). Consequently, pressing keys with a lower velocity between 0-63 produces the sound of the first region (‘airplane.wav’). Conversely, pressing keys faster with a velocity between 64-127 produces the sound of the second region (‘modem.wav’). This setup allows you to create multiple layers on the same keys, playing different sounds based on the speed of your key presses.
Thus, depending on the pace of your key presses, you can elicit different sounds. For those emulating a real musical instrument, recording various dynamics and meticulously layering them can contribute to crafting more realistic sounds.

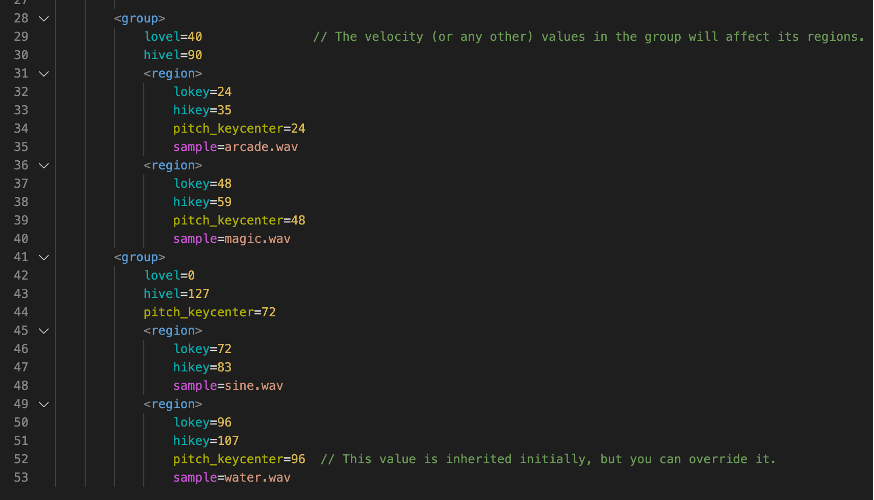
If you have experience with HTML or XML, you might find it strange that Line 28 and Line 41 have <group>, but there is no </group>. SFZ format doesn’t employ header nesting syntax; you only need to initiate with <group>, and there’s no requirement to end with </group>. Therefore, it’s crucial to enhance code readability by incorporating spaces, indentation, and line breaks. This becomes especially efficient when you can visually discern the hierarchical structure of your code, as demonstrated in the example.
The above example illustrates how to group regions for organization. <group> is useful if you plan to inherit certain parameters and also override parameters inherited from <global> (Line 6).
Both regions (Line 31 and Line 36) in the first group (Line 28) will inherit ‘lovel’ (Line 29) and ‘hivel’ (Line 30) opcode values from <group>, eliminating the need to set them up in each region.
Similarly, both regions (Line 45 and Line 49) in the second group (Line 41) will inherit ‘lovel’ (Line 42), ‘hivel’ (Line 43), and ‘pitch_keycenter’ (Line 44). However, the second region (Line 49) will override ‘pitch_keycenter.’
Additional Resources
SFZformat.com (https://sfzformat.com/) is a valuable resource for in-depth information, so feel free to visit and explore if needed. If you discover any useful techniques or come up with interesting code, please share them with me and other members via Discord.
Reply